Installing Database Commander #
- Download plugin from the URL in the email
- Extract the download.
- Unblock the DLL in the file properties window.
- Import the plugin DLL (System –> Solutions –> Plugin Manager –> Advanced –> Manage Plugins –> Add Plugin).
- Activate the plugin.
- Log out and back into the Control Center.
- Launch the plugin from the Tools menu in the left nav-bar.
Security Information #
Please note that access to the database is equivalent to Super Admin account access. Anyone with access to this plugin can read/write to all parts of the Automate server. The plugin does audit use, but discretion is advised when granting access to Database Commander
Using Database Commander #
Information Tab #
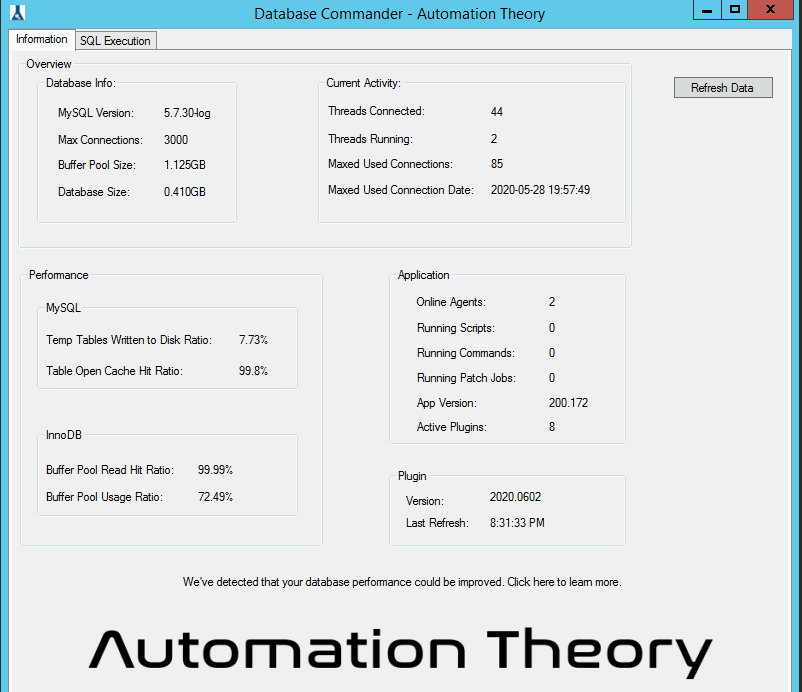
The overview section of the information tab displays MySQL demographics and current load metrics. This data can be reviewed to spot high-level configuration problems or to quickly see what the current load on the database is.
The performance section shows ratio-based metrics for the efficiency of MySQL. Each item has a tool-tip when hovered over to indicate the optimal value. Additionally, if non-optimized MySQL defaults are detected a message will appear below the informational section that is a clickable link to additional information about MySQL performance specifically for Automate servers.
The application section shows relevant information about application functions that have an impact or strong dependencies on MySQL load. This information can be used to correlate MySQL behavior with application behavior.
The plugin section shows the current plugin version number and the timestamp of the last data refresh. The data will refresh each time the “Refresh Data” button is clicked.

SQL Execution Tab #
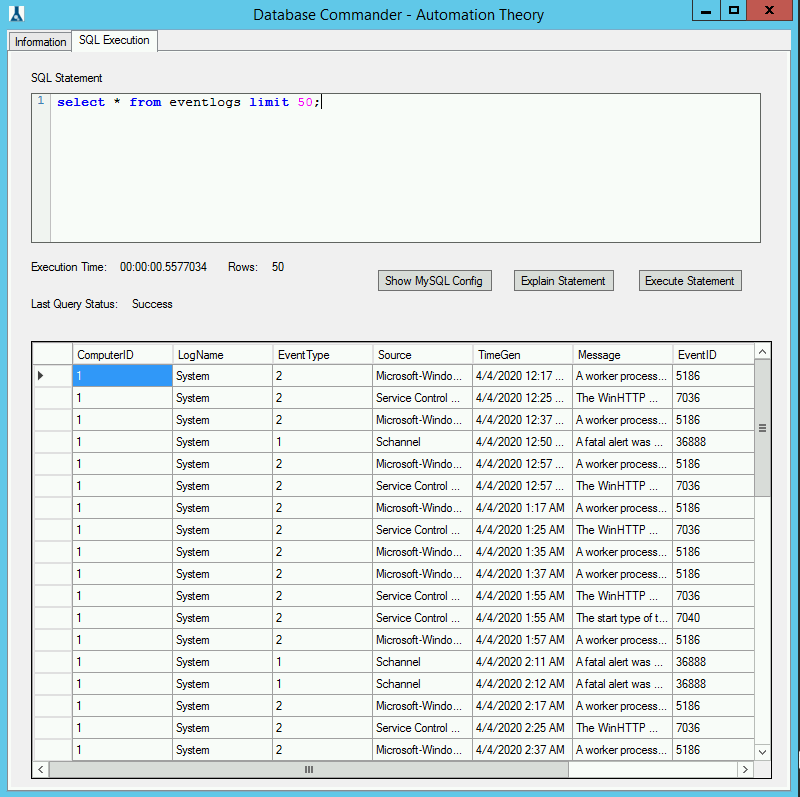
The SQL Statement box on the SQL execution tab is where MySQL statements can be input and run against the database. By default any statements using the keywords insert, update, delete, drop, or alter will not run, but rather the explain statement for them will be shown. To enable potentially destructive write operations enter the word “write” into the SQL statement box and click the “Execute Statement” button. This will enable a checkbox above the upper-right corner of the SQL statement box, and checking that box will enable potentially destructive statements to run.
Please note that it’s possible to cause breaking-changes to the application using statements that are not blocked by default in the double-safety filter. Please exercise caution and execute SQL statements at your own risk.
Keyboard Shortcuts #
The SQL statement box supports a number of keyboard shortcuts:
- Ctrl+Enter: Execute Statement
- Ctrl+W: Toggle word wrap on/off
- Ctrl+F, Ctrl+H: Find/Replace
- F3: Find Next
- Ctrl+Z, Ctrl+R: Undo/Redo
- Ctrl+U, Shift+Ctrl+U: Convert text to upper/lower case
- Ctrl+Shift+C: Toggle comment prefix
- Alt+Mouse, Alt+Shift+(Up, Down, Right, Left): Enables column selection mode
- Alt+Up, Alt+Down: Move selected lines up/down
- Shift+Del: Removes current line
- Ctrl+B, Ctrl+Shift-B, Ctrl+N, Ctrl+Shift+N – add, removes and navigates to bookmark
- Ctrl+Wheel, Crtl+Plus, Ctrl+Minus, Ctrl+0: Zoom in/out/reset
- Alt+F [char]: Find the nearest [char] (press Alt+F, release, then press the target [char])
- Ctrl+Up, Ctrl+Down: Scrolls up/down
Under the SQL statement box the execution time, status, and row count of the previously executed query are displayed. The execution time is the amount of time the application call to the database took, not just the duration of the query. The rows value is the number of rows that were returned from the database.
Any query that does not return any columns (such as a create table statement) will cause “Last Query Status” to be set to “Error” even if the statement was successful.
The output pane below in the lower part of the SQL Execution tab will display the results of the executed SQL query (if there are any). This output can be exported to a CSV file with the Ctrl+E keyboard shortcut when the output pane is selected.


